Thursday, October 22, 2015

Control the WebSphere Cluster using Jython

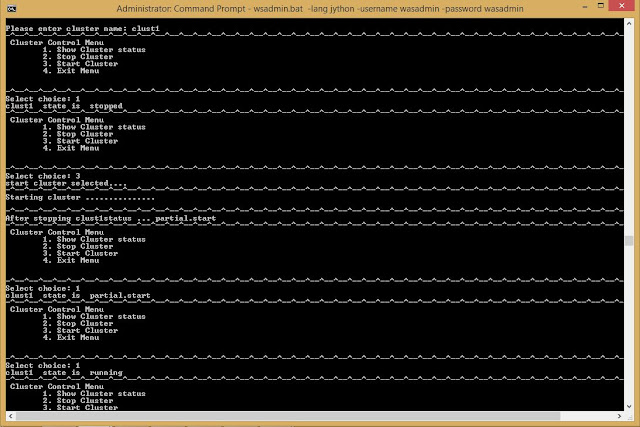
Hello automation with Jython enthuiastic Guys!! Welcome to this post. In this post we are going to explore more WebSphere cluster specific operations. Which are most important for doing automations with wsadmin scripting.

Cluster State using Jython

You can get the state of the cluster using AdminControl object method getAttribute will give that. The cluster state might be one of the three common important states

  1. websphere.cluster.running
  2. websphere.cluster.partial.start
  3. websphere.cluster.partial.stopped
  4. websphere.cluster.stopped
Cluster object required to get the state of the cluster, AdminControl will gives us the state of the cluster getAttribute method will takes two argument cluster object and 'state' command.


 Cluster = AdminControl.completeObjectName('cell='+ cell +',type=Cluster,name='+ cluster +',*')
 state = AdminControl.getAttribute(Cluster, 'state')


Start Cluster with Jython


To start the member servers of a cluster you need a clustername, that fetches the cluster object from a cell. After that using AdminControl we can start the cluster this will start all the member servers in the cluster.The invoke() method takes cluster object, control command 'start'. If the cluster state is already running then ripple start would be the best command.

 AdminControl.invoke(Cluster ,'start')
 AdminControl.invoke(Cluster ,'rippleStart')


Note: Corresponding node agent must be running where your cluster members are configured.

Stop Cluster using Jython


Stopping the cluster is very simple it also uses AdminControl object invoke method with cluster object and control command as 'stop':

AdminControl.invoke(Cluster ,'stop')


WebSphere Cluster controlling Jython script: stop, start Cluster


Using the above snippets with effective modular program structure to give task wise multiple functions the nice menu driven script as follows:

#----------------------------------------------------------------
#   Author   : Pavan Devarakonda
#  Date updated : 22-Oct-2015
#  Script File  : ClusterControl.py
#----------------------------------------------------------------
import time

def printBorder(): print '-^-' * 45
def cls(): print "\n\r" * 80
#----------------------------------------------------------------

# Status of a cluster on all nodes in the cell
#----------------------------------------------------------------
def clusterStatus(Cluster):
 state = AdminControl.getAttribute(Cluster, "state" )
 statelist=['stopped', 'partial.stopped', 'running', 'partial.start']
 for s in statelist :
  if state.endswith(s): 
   return s
 
def startCluster(cell, Cluster):
 state = AdminControl.getAttribute(Cluster, 'state')
 printBorder()
 if (state == 'websphere.cluster.running'):
  print "Cluster is running\nRipple starting cluster ............."
  print AdminControl.invoke(Cluster ,'rippleStart')
 else:
  print "Starting cluster ............... "
  print AdminControl.invoke(Cluster ,'start')
 printBorder()
 time.sleep(30)  # waiting time in seconds you can change it according to your needs
  
def stopCluster(cell, Cluster):
 state = AdminControl.getAttribute(Cluster, 'state')
 if (state == 'websphere.cluster.running'):
  print AdminControl.invoke(Cluster ,'stop')
  time.sleep(30)
 else:
  print "Cluster cannot stopped"
 printBorder()
 

def menu():
 printBorder()
 print """ Cluster Control Menu
 1. Show Cluster status
 2. Stop Cluster
 3. Start Cluster
 4. Exit Menu
 
 """
 printBorder()
 choice=input("Select choice: ")
 return choice
#  Main program   
cls()
cellName=AdminControl.getCell()
cluster=raw_input("Please enter cluster name: ")
clusterObj = AdminControl.completeObjectName('cell='+ cellName +',type=Cluster,name='+ cluster +',*')

while 1:
 ch=menu()
 if ch == 1:
  print cluster, " state is ", clusterStatus(clusterObj)
 elif ch == 2:
  print "stopping the cluster member servers"
  stopCluster(cellName, clusterObj)
  print "After stopping "+ cluster +"status ...", clusterStatus(clusterObj)
 elif ch==3:
  print "start cluster selected...."
  startCluster(cellName, clusterObj)
  print "After stopping "+ cluster +"status ...", clusterStatus(clusterObj)
 elif ch==4: 
  print "Exit from menu..."
  break

The execution of the above cluster script conntype as SOAP based and it is connected with managed Cell of wsadmin Jython shell is as follows:

wsadmin>execfile('C:/Users/Raghav/Desktop/ClusterControl.py')

WebSphere Cluster Control script in Jython
You can see the update on the IBM WebSphere integrated console as well the changes

Cluster member servers status on IBM integrated admin console


This can be useful for the following environments:

  1. WebSphere Portal 
  2. WebSphere Process Server
  3. WebSphere e-business server 
You might also interest to see the successful executed script using Jython:

Saturday, October 17, 2015

Jython Deployment automation in WebSphere

We can have different JEE applications to install on IBM WebSphere Application Server such as:

  1. Enterprise applications .ear files
  2. Web Applications .war files
  3. Business Application
  4. Utility/shared libraries .jar files
You need to know what type of application you wish to deploy. Where to install it in the Cell. If it is an EJB application you need to provide the binding details as an initial parameter. All application-related functions are available with AdminApp object. For making the application changes permanent you need to save the AdminConfig.

Web application deployment with Jython wsadmin


Let's see the war file installation process


AdminApp.install(ear, '[-BindJndiForEJBBusiness [[ejb_1.jar ejb1   ejb_1.jar,META-INF/ejb-jar.xml test.ejb1 jndi1 ]]]')

# For Web application inside .ear files you need to provide virtual host name. These virtual host varies in the ND cell.
AdminApp.install('fullpath/yourApp.ear', ['-MapWebModToVH', [['.*', '.*', 'default_host']]])
AdminConfig.save()


A menu driven Jython script for wsadmin


#================================================================
#
#               Script Name :  Deployment.py
#               Created Date:   17 Oct 2015
#               Developed by:   Pavan Devarakonda
#
#================================================================

def cls(): print '\n'*45
def linedesign(): print '@'*50
def menu():
        linedesign()
        print """Deployment options
        1. Show deployed Apps
        2. Install App
        3. Uninstall App
        4. Exit
        """
        linedesign()
        ch=input("Please enter your choice: ")
        return ch

def main():
        """ Main program logic starts here """
        while 1:
                ch=menu()
                if ch == 1:
                        cls(); linedesign()
                        print "The list of application deployed on the Cell"
                        print AdminApp.list()
                        linedesign()
                elif ch == 2:
                        print "You selected to deploy application"
                        appPath=raw_input("Enter application path: ")
                        appName=raw_input("Enter application name: ")
                        AdminApp.install( appPath,  ['-appname',appName , '-MapWebModToVH', [['.*', '.*', 'default_host']]])
                        AdminConfig.save()
                elif ch == 3:
                        linedesign()
                        print "Uninstall which application?"; appName=raw_input("Application name: ")
                        AdminApp.uninstall(appName)
                        AdminConfig.save()
                        print "Uninstallation completed...."
                else:
                        print "Exiting from the script...."
                        #sys.exit(0)
                        break

main()


Its execution as follows:

Check the defalthost port number mapping on the admin console.

execfile('/home/vagrant/scripts/Deployment.py')

Deployment script execution output

Install Web application on WebSphere server

Application Status after installing

Uninstall web application using Jython 

Web application access successful this concludes Jython script working fine


WebSphere Admins please write your comments how to make more generic script which could deploy to cluster as well.

  • Deploy EJB, WebService applications
  • Target to selected cluster or app-server
  • Clearing cache for web application
  • App server restart if required


Tuesday, October 13, 2015

File operations in Jython

File operations are very important for Jython scripting.

File Operations in wsadmin scripting


Creating a file with list of archives which are present in the installableApp folder.

vagrant@ubuntu-was8:~/IBM/WebSphere/AppServer/installableApps$ ls > ~/scripts/applist.txt
vagrant@ubuntu-was8:~/IBM/WebSphere/AppServer/installableApps$ cat ~/scripts/applist.txt
AjaxProxy.war
CacheMonitor.ear
DefaultApplication.ear

...

WSNServicePoint.ear


These kind of need would be in every automation script; It may be list of deployables or Server to be restarted.
###############################
#
# Script File: fileoper.py
# usage : wsadmin -f [path 2="" script=""]/fileoper.py
# The file read operation
#
###############################
import os,sys

f=open("/home/vagrant/scripts/applist.txt")
for appName in f.readlines():
        print appName.split('.')[0]

print "End of the file..."


wsadmin>execfile('/home/vagrant/scripts/fileoper.py')
AjaxProxy
CacheMonitor
DefaultApplication

...
WSNServicePoint
End of the file...


The File write operations in Jython

Here we have to open the file with "w" or "w+" file mode for writing to a file object. When a file opened for write operation you can use the following :

  1. redirecting operator >>
  2. write function
  3. writelines function

vi filewr.py
# This illustrates File write operations
def cls(): print "\n"*80

# Main program starts here

cls()

f = open('/tmp/test.txt', 'w+')
writeList=["Dmgr01", \
"AppServer1", \
"AppServer2", \
"AppServer3", \
"WebServer1", \
"WebServer2", \
"WebServer3"]

print "Writing into the file..."

for s in writeList:
 print >>f, s
 print "."

#f.close()
# Default file mode is read (r)
#f = open('test.txt')

# We can move f position here it is 0
f.seek(0)

print "After moving the file pointer to beginning..."
sno=1
for line in f.readlines():
 print sno, line
 sno+=1

f.close()


The execution of the above file write operation is as follows:


Monday, October 12, 2015

Programming Control in Jython

The if-else construct in Jython

Syntax:
if condition1 :
    true statements
elif condition2 :
    true condition2 statements
else:
    false statements

Example:
In your monitoring scripts you might need for the variable must be cross check across multiple servers. Assuming that you got the JVM Valules using if condition statements find which server is having more Java objects occupied.
# This script illustrates the if-else-elif usage

print "Enter 3 server JVM Size in MB: "
s1, s2, s3= input('3 integer values')

print "Given JVM Values:", s1, s2, s3
print '#'*50
if s1 > s2 and s1 >s3:
        print s1, " s1 JVM server overloaded"
elif s2 > s1 and s2 > s3:
        print s2, " s2 jvm overloaded"
elif s3 > s1 and s3 > s2:
        print s3, " s3 JVM Overloaded"
else:
        print "Error in input plz check"
print '#'*50

Output:
wsadmin>execfile('/home/vagrant/scripts/ifelse_sample.py')
Enter 3 server JVM Size in MB:
3 integer values120, 300, 90
Given JVM Values: 120 300 90
##################################################
300  s2 jvm overloaded
##################################################


The while loop in Jython


The while loop in Jython can be constructed with the three important statements: initialize conditional expression update statement either increment or decrements
# this is while loop sample

i=1
while i<=10:
 print "server"+str(i)
 i+=1
else:
 print "completed in the else now.. "+str(i)

Execution of this while_sample.py script as follows:
sadmin>execfile('/home/vagrant/scripts/while_sample.py')
server1
server2
server3
server4
server5
server6
server7
server8
server9
server10
completed in the else now.. 11


While loop as infinite loop This is the common requirement for most of the scripting languages. You many need a menu that options can be reused multiple times then we can call those statements into the infinite loop. These infinite loop doesn't requires initialization, update statements. The condition will be only True value that is in Jython 1 as shown below example.
# There 3 options start, stop, status

while 1:
        print '@'*50
        print "Server Control Menu"
        print '@'*50
        print "1. start server"
        print "2. Stop server"
        print "3. Status server"
        print '@'*50
        mop=raw_input("Please enter your option:")

        if mop == '1':
                print "You selected start"
        elif mop == '2':
                print "You selected stop"
        elif mop == '3':
                print "You selected status"
        else:
                print "Invalid option"
                print "Exiting..."
                sys.exit()

Execution of the Menu driven program in Jython :
wsadmin>execfile('/home/vagrant/scripts/while_menu.py')
While loop with infinite menu display


The for loop in Jython


Whenever you work on list objects then use the for loop it is common in Jython. We have a special built-in Python function that is range(). This is having three variants:

  1. The range up to n range(n)
  2. The range starting, ending boundaries range(start, end)
  3. The range starting, ending with step opton range(start, end, step)


# This script illustrates range function and for loop

r1=range(10) # 0..9
print "r1 range numbers"
for i in r1: print i

r2=range(2, 10) # 2..9
print "r2 range numbers"
for i in r2: print i

r3=range(2,10,2)
print "r3 range numbers"
for i in r3: print i

The execution of the above range testing for loop script saved as for_sample.py

The range() function with for loop in Jython


To work with for loop we must have a list of elements. It actually designed for iterate on the each eliment of sequence type objects in the same way.
# This script illustrates the list operations with for loop

mylist=[3,4,2,6,8]
print "mylist:", mylist

list2=[ x * 2 for x in mylist ]
print "Comprehensive list", list2

filteredList=[ x * 3 for x in mylist if x > 4 ]
print "filteredList:", filteredList

nestList=[ x * 2 for x in [y+1 for y in mylist]]
print "Nested List :", nestList


These for loops are very powerful because you may need some situations list of server without dmgr and web servers or vice versa. The filtering capability is really improves your programming ability to create optimistic code.
Jython for loop flexibility


Wednesday, October 7, 2015

String sequence in Jython wsadmin

 String sequence in Jython

Strings are set of characters enclosed with single quotes or double or triple quotes. String objects are similar to tuple sequence objects. String objects are immutable. You cannot change the current string content. We need to use the new string object for modify the contents.

Strings can be two variants:

  1. raw string
  2. normal string

All the help method out comes are raw strings they are parsed when it is given to print command.
wsadmin>rawstr=AdminTask.help()
wsadmin>rawstr
'WASX8001I: The AdminTask object enables the execution of available admin\n\tcommands.  AdminTask commands operate in two modes:\n\tthe default mode is one which AdminTask communicates with the WebSphere\n\tserver to accomplish its task. A local mode is also available, in which\n\tno server communication takes place. The local mode of operation is\n\tinvoked by bringing up the scripting client using the command line\n\t"-.

...
...
Use help command\n\t\t\t\t\tto get information on the target object\n\t\t\t\t\tand options.'
wsadmin>print rawstr
WASX8001I: The AdminTask object enables the execution of available admin
        commands.  AdminTask commands operate in two modes:
        the default mode is one which AdminTask communicates with the WebSphere
        server to accomplish its task. A local mode is also available, in which
        no server communication takes place. The local mode of operation is

... removed lines for conveniance 

You can say WASShell that don't parse the string, keep as it as raw string. To define raw string r'' must be prefixed for the string.
wsadmin>scriptpath='c:\scripts\test'
wsadmin>scriptpath
'c:\\scripts\test'
wsadmin>print scriptpath
c:\scripts      est
wsadmin>scriptpath=r'c:\scripts\test'
wsadmin>print scriptpath
c:\scripts\test


 Jython String functions

There are nearly 40+ string functions available in Python. Almost same works in Jython as well.
Lets experiment on simple string

wsadmin>serverid=AdminConfig.getid('/Server:server1')
wsadmin>serverid
'server1(cells/ubuntu-was8Node01Cell/nodes/ubuntu-was8Node01/servers/server1|server.xml#Server_1183121908656)'
wsadmin>s=serverid

The split() function

Strings can be split with a delimiter which can be any symbol or a character.
Let us split the string with '#' symbol. And also test the endswith() function in the for loop.

wsadmin>s.split('#')
['server1(cells/ubuntu-was8Node01Cell/nodes/ubuntu-was8Node01/servers/server1|server.xml', 'Server_1183121908656)']

wsadmin>for e in s.split('/'):
wsadmin> if e.endswith('Cell'): print e
wsadmin>
ubuntu-was8Node01Cell


String operations


Repetition with * operator
wsadmin>d='=*'
wsadmin>print d * 50
=*=*=*=*=*=*=*=*=*=*=*=*=*=*=*=*=*=*=*=*=*=*=*=*=*=*=*=*=*=*=*=*=*=*=*=*=*=*=*=*=*=*=*=*=*=*=*=*=*=*


Concatenation of string
wsadmin>s1="WebSphere Adminitration"
wsadmin>s2='wsadmin automation'
wsadmin>s3=s1+s2
wsadmin>print s3
WebSphere Adminitrationwsadmin automation


The strip functions, startswith, endswith, lower, upper, find functions


As you know strings are immutable you can translate when printing to stdout or screen.
s="Kishore,Wsadmin"
print s.split(",")

s1="    string strip example    "
print "s1.rstrip :", s1.rstrip()
print "lstrip :", s1.lstrip()
print "strip :", s1.strip()

print "endswith :", s.endswith('n')
print "endswith :", s.endswith('in')
print "startswith :", s.startswith('k')

print "lower case :", s.lower()
print "upper case  :", s.upper()

print "find substring :", s.find('shore')
print "replace substring  :", s.replace('Wsadmin','websphereadmin')


output

wsadmin>execfile('/home/vagrant/scripts/strfun.py')
['Kishore', 'Wsadmin']
s1.rstrip :     string strip example
lstrip : string strip example
strip : string strip example
endswith : 1
endswith : 1
startswith : 0
lower case : kishore,wsadmin
upper case  : KISHORE,WSADMIN
find substring : 2
replace substring  : Kishore,websphereadmin


General string function
x="k"
if x in s1:
        print "it is present"
else:
        print "it is not present"
x="K"
if x not in s1:
        print "it is not present"
else:
        print "it is present"
print "slicing",s1[2:6]

print "slicing",s1[2:]

print "slicing",s1[0:3],s1[:3]


o/p

wsadmin>execfile('/home/krish/jython/string.py')
string operators
cancatenation s1+s2 kishorekumar
multiplier operator s1*3 kishorekishorekishore
it is present
it is not present
slicing shor
slicing shore
slicing kis kis


Tuesday, October 6, 2015

Jython List in wsadmin

A list can hold following type of data
  • variables
  • numbers
  • strings 

List varieties on wsadmin shell


Let us have different data into the list and then try to access the elements using index values.
wsadmin>varlist=[100,'Raghav', 99.9,'M']
wsadmin>print varlist
[100, 'Raghav', 99.9, 'M']
wsadmin>print varlist[2]
99.9
wsadmin>print varlist[1]
Raghav


Number List in Jython


Lets experiment with different numbers on Jython shell. When I entered big number then Jython shell throwing Overflow error. To fix this we need to append 'L' this is only for assigning the values of List elements.
wsadmin>numlist=[9000,9999999999, 8988,0]
Traceback (innermost last):
  (no code object) at line 0
OverflowError: integer literal too large
wsadmin>numlist=[9000,9999999999L, 8980, 0]
wsadmin>print numlist[1]
9999999999
wsadmin>print numlist[3]
0


String Lists


String variable also works in similar to other data types. Here we are considering the string as one element. Lets do experiment with this...

wsadmin>strlist=['Vybhava','Technologies','wsadmin','Jython Scripting']
wsadmin>print strlist
['Vybhava', 'Technologies', 'wsadmin', 'Jython Scripting']
wsadmin>print strlist[3]
Jython Scripting


Sequence operators on List


Concatenation of multiple lists with + operator

wsadmin>newlist=strlist + numlist
wsadmin>print newlist
['Vybhava', 'Technologies', 'wsadmin', 'Jython Scripting', 9000, 9999999999L, 8980, 0]


Multiplying with * operator.

wsadmin>strlist * 2
['Vybhava', 'Technologies', 'wsadmin', 'Jython Scripting', 'Vybhava', 'Technologies', 'wsadmin', 'Jython Scripting']


Membership operation on List with 'in'


The 'in' operator is simple English word that help you to write conditional statement which will check the given element is member of list.

wsadmin>'wsadmin' in strlist
1
wsadmin>'python' in strlist
0


Slice the list

You can extract the required elements from the list using square braces [] with range separator as colon (:). The format of slice is [start:end] if you are not mention start value then it will fetches from the begin of the list. Similarly for end value is blank means it is going to slice up to the end of the list.


wsadmin>strlist=['server1','server2','web1','web2']
wsadmin>print strlist[1:2]
['server2']
wsadmin>print strlist[1:3]
['server2', 'web1']
wsadmin>print strlist[:2]
['server1', 'server2']
wsadmin>print strlist[2:]
['web1', 'web2']


List methods

The python dir() command will gives you the method/attribute list of any object. Here we got 9 list methods, lets experiment on each and try to understand the usage.
wsadmin>emptylist=[]
wsadmin>print emptylist
[]

wsadmin>dir(emptylist)
['append', 'count', 'extend', 'index', 'insert', 'pop', 'remove', 'reverse', 'sort']

wsadmin>emptylist.append('Praveen')
wsadmin>emptylist

wsadmin>emptylist.insert(1,'Sudheer')
wsadmin>emptylist
['Preetham', 'Sudheer', 'Praveen']

wsadmin>revlist=emptylist
wsadmin>revlist.reverse()
wsadmin>emptylist
['Praveen', 'Sudheer', 'Preetham']
wsadmin>revlist
['Praveen', 'Sudheer', 'Preetham']

wsadmin>r=emptylist[:]
wsadmin>r.reverse()
wsadmin>r
['Preetham', 'Sudheer', 'Praveen']
wsadmin>emptylist
['Praveen', 'Sudheer', 'Preetham']
wsadmin>emptylist.extend('Pavan')
wsadmin>emptylist
['Praveen', 'Sudheer', 'Preetham', 'P', 'a', 'v', 'a', 'n']
wsadmin>emptylist.pop()
'n'

wsadmin>emptylist.remove('P')
wsadmin>emptylist
['Praveen', 'Sudheer', 'Preetham', 'a', 'v', 'a']

wsadmin>emptylist.append('Preetham')
wsadmin>emptylist
['Praveen', 'Sudheer', 'Preetham', 'a', 'v', 'a', 'Preetham'  , 'Preetham']
wsadmin>emptylist.count('Preetham')
3


wsadmin>emptylist.sort()
wsadmin>emptylist
['Praveen', 'Preetham', 'Preetham', 'Preetham', 'Sudheer', '  a', 'a', 'v']


Sequence functions on list objects

You could use sequence functions on tuple, list, string objects. Here I am going to show you on the list how it works:

wsadmin>numlist
[129, 22, 3]
wsadmin>min(numlist)
3
wsadmin>max(numlist)
129
wsadmin>cmp(r,emptylist)
1
wsadmin>cmp(numlist,emptylist)
-1
wsadmin>t=(10, 4, 5, 2)
wsadmin>t2l=list(t)
wsadmin>t2l
[10, 4, 5, 2]
wsadmin>t2l.append(100)
wsadmin>t.append(55)  ############### Tuples are immutable they don't allow us to add elements!!
WASX7015E: Exception running command: "t.append(55)"; except  ion information:
com.ibm.bsf.BSFException: exception from Jython:
Traceback (innermost last):
  File "", line 1, in ?
AttributeError: 'tuple' object has no attribute 'append'


Monday, October 5, 2015

Tuples in Jython

Tuple

Hi everyone in this post I would like to workout how does the Jython tuple can be constructed and how to display their content and their operations.

WebSphere Admin must know about tuple because it is heavily used internal MBeans for storing data in them. What I have understood about Tuple data type is:

  • A tuple is a sequence of immutable Python Objects in the Jython
  • The  tuple content cannot be changed - only assignment that is why we don't see any other functions on them
  • Use parenthesis () to define
  • Here elements can be stored into a tuple with comma-separated values
  • Tuples can contain numbers, strings, nested sub-tuples, or nothing or combination that is heterogeneous types
Tuple datatype in Jython
Tuple in Jython

Let me experiment and prove that all.

# This script list how to use the tuple.

t1=(1,2,3,4)
print "integer tuple", t1

t2=(1.2,10.5,13.4)
print "float tuple", t2

t3=('app1','app2','app3')
print "string tuple", t3

print "Accessing tuple with indexes"

print "need t1 third element",t1[3]

print "second element from t2,t3", t2[2],t3[2]

print "length of t1",len(t1)


Let me execute the tuple examples script from the wsadmin command prompt.
wsadmin>execfile('/home/krish/jython/tuple.exa.py')
integer tuple (1, 2, 3, 4)
float tuple (1.2, 10.5, 13.4)
string tuple ('app1', 'app2', 'app3')
Accessing tuple with indexes
need t1 third element 4
second element from t2,t3 13.4 app3
length of t1 4

Tuple Basic Operations

Jython Tuple Basic Operations


Tuple with heterogeneous type elements

A tuple can be stored with different data type values together as well. For example we can have a tuple with the mix of integer, string, float elements together. These kind of data you might see in when you fetch data from runtime elements of WebSphere servers.

wsadmin>tmix=(10, 'Server', 23.005)
wsadmin>tmix[1]
'Server'


Tuple of tuples

A Tuple can have small tuples inside it. Accessing the tuple elements is same for all sequences that is using index values, when index points to the inside tuple it will retrives element as tuple.

wsadmin>tt=(10, (1,2,3), 45.4)
wsadmin>tt[1]
(1, 2, 3)
wsadmin>tt[1][1]
2


Tuple operators

Tuples respond to the + and * operators much like strings; they mean concatenation and repetition here too, except that the result is a new tuple, not a string.

wsadmin>tt+tmix
(10, (1, 2, 3), 45.4, 10, 'Server', 23.005)
wsadmin>tt * 3
(10, (1, 2, 3), 45.4, 10, (1, 2, 3), 45.4, 10, (1, 2, 3), 45.4)


Membership operator 'in' on Tuple


The 'in' operator is used to check the given value matches to one of the element in the tuple. This operator returns boolean values 1 for true, 0 for false.

wsadmin>tt
(10, (1, 2, 3), 45.4)
wsadmin>10 in tt
1
wsadmin>3 in tt[1]
1
wsadmin>3 in tt
0


Accessing Tuple with for loop

In Jython for loop works with Iterator where it gets each element into the iterator and if tuple has next element then moves to next iteration. You can use the iterator to do the required operations, validations required to fulfill the script logic.
wsadmin>for i in tt: print i
wsadmin>
10
(1, 2, 3)
45.4


Comparing Tuples

Sequence specific compare operator ' is ', it is simple English meaning.

wsadmin>resources=('jdbc','jms','security')
wsadmin>r=resources
wsadmin>r is resources
1
wsadmin>r in resources
0
wsadmin>r==resources
1

Sunday, October 4, 2015

Jython script for Server Stop, Start, restart using wsadmin

Server Control from wsadmin

The building blocks for this script are as follows:

  1. Get Node name 
  2. Get the Server name
  3. Get the server state
  4. Using the AdminControl stop/start/restart

How to get Node Name in wsadmin using Jython?


We can use the nodeName using AdminControl  with getNode method or completeObjectName querying.

wsadmin>nodeName=AdminControl.getNode()
wsadmin>print nodeName
ubuntu-was8Node01

wsadmin>objn = AdminControl.completeObjectName('WebSphere:type=Server,*')

wsadmin>print objn
WebSphere:name=server1,process=server1,platform=proxy,node=ubuntu-was8Node01,j2eeType=J2EEServer,version=8.5.5.6,type=Server,mbeanIdentifier=cells/ubuntu-was8Node01Cell/nodes/ubuntu-was8Node01/servers/server1/server.xml#Server_1183121908656,cell=ubuntu-was8Node01Cell,spec=1.0,processType=UnManagedProcess

wsadmin>print AdminControl.getAttribute(objn, 'nodeName')
ubuntu-was8Node01


In the above interaction we have experimented in two options directly fetching using getNode() method it is actually pulls the details from the deployment manager to which wsadmin connected. The other option is going to fetch the server wide node name associated details.

How to get the Server Name in wsadmin?


If you need the server name for stop or start you need to fetch it using queryName method where you need to mention the type as Server as shown below. From that Object you need to fetch the attribute name.

wsadmin>wsadminSvr =AdminControl.queryNames("node="+AdminControl.getNode( )+",type=Server,*" )
wsadmin>wsadminSvr
'WebSphere:name=server1,process=server1,platform=proxy,node=ubuntu-was8Node01,j2eeType=J2EEServer,version=8.5.5.6,type=Server,mbeanIdentifier=cells/ubuntu-was8Node01Cell/nodes/ubuntu-was8Node01/servers/server1/server.xml#Server_1183121908656,cell=ubuntu-was8Node01Cell,spec=1.0,processType=UnManagedProcess'


wsadmin>s = AdminControl.getAttribute(wsadminSvr, "name" )
wsadmin>s
'server1'

How to get server name when WebSphere Cell is stopped?


This is the common requirement for the automations, where we don't want to hard code the server names. We need the list of the servers when the Dmgr not running. The AdminConfig object is available even when the environment is down.

wsadmin>serverlist=AdminConfig.list('Server').split('\n')
wsadmin>print serverlist
['server1(cells/ubuntu-was8Node01Cell/nodes/ubuntu-was8Node01/servers/server1|server.xml#Server_1183121908656)', 'webserver1(cells/ubuntu-was8Node01Cell/nodes/ubuntu-was8Node01/servers/webserver1|server.xml#Server_1443584628692)']

wsadmin>serverlist[0].split('(')
['server1', 'cells/ubuntu-was8Node01Cell/nodes/ubuntu-was8Node01/servers/server1|server.xml#Server_1183121908656)']
wsadmin>serverlist[0].split('(')[0]
'server1'
wsadmin>serverlist[1].split('(')[0]
'webserver1'

Hence you need a loop to fetch all servers present in the Cell.

How to get the state of WebSphere server with Jython


Here we go ... Simple script that will fetches the server state and print out that. You can call the serverState() function in a loop when you have the list of the servers.

def serverState(serverName):
 serverObj = AdminControl.completeObjectName('WebSphere:type=Server,name=' + serverName + ',*')
 if len(serverObj) > 0:
  serverStatus = AdminControl.getAttribute(serverObj, 'state')
 else:
  serverStatus = 'STOPPED'
 print "%15s %s" %(serverName, serverStatus)
serverState('server1')
serverState('webserver1')

You can execute the above script as following:

wsadmin>execfile('/home/vagrant/scripts/serverstat.py')
        server1 STARTED
     webserver1 STOPPED

Now lets use the ingredients which we collected in the above and construct the Jython script.

How to Stop the server using Jython?


The AdminControl have many options to control(stop/start) servers. Here we can use stopServer method. where it takes different number of arguments to stop the server at different scenarios.

AdminControl.stopServer(serverName, 'immediate')

Stops a server. If the "immediate flag" is set ton"immediate" then a stopImmediate is performed for the given server. Otherwise, a normal graceful stop is performed.

AdminControl.stopServer(serverName, nodeName)

This could be the real-time admin requirement, here we deal with node and its associated servers. This will stops a server in the specified node.

AdminControl.stopServer(serverName, nodeName, 'immediate')

Stops a server in the specified node. If the "immediate flag" is set to "immediate" then a stopImmediate is performed for the specified server. Otherwise, a normal stop is performed.

AdminControl.stopServer(serverName, nodeName, 'terminate')

Stops a server on the specified node. If the "terminate flag" is set to "terminate" then a terminate is performed for the specified server. Otherwise, a normal stop is performed. This operation can only be performed on a Managed Process. The node name is a required argument.

AdminControl.stopServer method in Jython


Lets stop the server from wsadmin Jython here it is WebSphere Network deployment environment:

wsadmin>AdminControl.stopServer('server1','immediate')
'WASX7264I: Stop completed for server "server1" on node "ubuntu-was8Node01"'

Unfortunately I cannot start this server1 because it is unmanaged server. If it was in a managed profile then I can do startServer function on AdminControl object.

With Managed environment see how it goes...

Stop Server on the Node with immediate flag

Start server using Jython wsadmin


Just like stop server have several options
startServer(serverName, wait)
Starts a server with scripting process is attached to a Node Agent server.
startServer(serverName, wait)
Starts a server by locating it in the configuration, scripting process is attached to a Node Agent server.
startServer(serverName, nodeName)
Starts a server in the specified node by locating it in the configuration scripting process is attached either to a Node Agent or Deployment Manager process.
 startServer(serverName, nodeName, wait)
Starts a server in the specified node and  "wait" time in seconds, and this will work when scripting process is attached either to a Node Agent or Deployment Manager process.

startServer in Jython wsadmin

AdminControl.startServer method in Jython

Hope you enjoyed this automation learnings.
Write your comments what you thing about this post? and also write your expectations.

Friday, October 2, 2015

Invoking Jython script for wsadmin

Once you have installed WebSphere you have Jython shell built in available.

Logon profile editing for environment variables

In Linux bash shell is default login shell. Hence we can edit the .bash_profile or .bashrc file to get the user defined environment variables. We can define the alias for lengthy repeated tasks as shortcuts with simple shorten words.

Here I have my environment setup from .bash_profile

clear
echo "Welcome to WebSphere 8.5.5.6"
export PROFILE_HOME="/home/vagrant/IBM/WebSphere/AppServer/profiles"
export WAS_HOME=/home/vagrant/IBM/WebSphere/AppServer

alias wsadmin="cd /home/vagrant/IBM/WebSphere/AppServer/profiles/rplan-profile/bin/; . wsadmin.sh -lang jython"
alias ll="ls -lahtr"
alias cls="clear"
alias dmgrbin="cd ${WAS_HOME}/profiles/rplan-profile/bin; ls -lrth"
alias nodebin="cd ${WAS_HOME}/IBM/WebSphere/AppServer/profiles/rplan-profile"

Invoking your wsadmin for Jython made simple with alias at the command line you can simply use wsadmin it will navigate to the profile/bin directory then execute the wsadmin.sh script with the lang option jython.

vagrant@ubuntu-was8:~$ wsadmin
dirname: invalid option -- 'b'
Try 'dirname --help' for more information.
-bash: /setupCmdLine.sh: No such file or directory
WASX7209I: Connected to process "server1" on node ubuntu-was8Node01 using SOAP connector;  The type of process is: UnManagedProcess
WASX7031I: For help, enter: "print Help.help()"
wsadmin>

Interactive mode wsadmin

Trail and error we can do mostly at the interactive mode wsadmin shell. When we get the results as expected then we can collect all of those statement to form the script.
wsadmin>print "Hello Jython World"
Hello Jython World
wsadmin>print 10+20*2/5
18
wsadmin>import sys
wsadmin>sys.stdout.write('Jython is powerful automation tool\n')
Jython is powerful automation tool

The above connection default to SOAP based it will be taking the connection parameters from the profile that is available to it.

Connect in local mode

When you use the -conntype NONE
vagrant@ubuntu-was8:~$ wsadmin -conntype NONE
dirname: invalid option -- 'b'
Try 'dirname --help' for more information.
-bash: /setupCmdLine.sh: No such file or directory
WASX7357I: By request, this scripting client is not connected to any server process. Certain configuration and application operations will be available in local mode.
WASX7031I: For help, enter: "print Help.help()"
wsadmin>

Script mode wsadmin

Script mode is that where you can make simple blocks of code into program structure.
# This is first Jython script

print "Hey this is first Jython script"
print "you can use single quotes, double quotes'"
ml="""
 multiple
 new line
 another line
"""
print ml


To run the script mode you need to use the -f option then the python file path in the command line.
vagrant@ubuntu-was8:~$ wsadmin -f /home/vagrant/scripts/first.py
dirname: invalid option -- 'b'
Try 'dirname --help' for more information.

Hey this is first Jython script
you can use single quotes, double quotes'

 multiple
 new line
 another line

wsadmin>


Wednesday, September 30, 2015

Latest Jython using in Thin Client WebSphere 8.5 on Vagrant Ubuntu box

How to use the latest Jython for wsadmin

Today my experiment on renovating wsadmin Jython version.

How to check the current Jython version?


It is very simple you can try with sys module attribute version and one more thing your jdk that used for wsadmin runs on which version you can know by sys.platform.
wsadmin>print sys.version
2.1
wsadmin>print sys.platform
java1.6.0


  1. Installing Jython in Thin Client Home

  2. Executing the Jython jar command in the ThinClt/lib directory :
    vagrant@ubuntu-was8:~/ThinClt/lib$ java -jar /vagrant/was8_5_install/jython-installer-2.7.0.jar
    Welcome to Jython !
    You are about to install Jython version 2.7.0
    (at any time, answer c to cancel the installation)
    For the installation process, the following languages are available: English, German
    Please select your language [E/g] >>> E
    Do you want to read the license agreement now ? [y/N] >>> N
    Do you accept the license agreement ? [Y/n] >>> Y
    The following installation types are available:
      1. All (everything, including sources)
      2. Standard (core, library modules, demos and examples, documentation)
      3. Minimum (core)
      9. Standalone (a single, executable .jar)
    Please select the installation type [ 1 /2/3/9] >>> 2
    Do you want to install additional parts ? [y/N] >>> y
    The following parts are selectable (n = no more) [mod/demo/doc/src/ensurepip/N] >>> N
    N scheduled for installation
    The following parts are selectable (n = no more) [mod/demo/doc/src/ensurepip/N] >>> n
    Do you want to exclude parts from the installation ? [y/N] >>> y
    The following parts are selectable (n = no more) [mod/demo/doc/src/ensurepip/N] >>>
    Please enter the target directory >>> /home/vagrant/ThinClt/lib/jython
    Unable to find directory /home/vagrant/ThinClt/lib/jython, create it ? [Y/n] >>> Y
    Your java version to start Jython is: Oracle Corporation / 1.7.0_79
    Your operating system version is: Linux / 3.19.0-25-generic
    Summary:
      - mod: true
      - demo: true
      - doc: true
      - src: false
      - ensurepip: true
      - JRE: /usr/lib/jvm/java-7-openjdk-amd64/jre
    Please confirm copying of files to directory /home/vagrant/ThinClt/lib/jython [Y/n] >>> Y
     10 %
     20 %
     30 %
     40 %
     50 %
     60 %
     70 %
    Generating start scripts ...
    Installing pip and setuptools
     90 %
    Ignoring indexes: https://pypi.python.org/simple/
    Downloading/unpacking setuptools
    Downloading/unpacking pip
    Installing collected packages: setuptools, pip
    Successfully installed setuptools pip
    Cleaning up...
     100 %
    Do you want to show the contents of README ? [y/N] >>> N
    Congratulations! You successfully installed Jython 2.7.0 to directory /home/vagrant/ThinClt/lib/jython.
  3. Copy Java from IBM WebSphere installed path
    cp -R $WAS_HOME/java ThinClt/
    
  4. copy com.ibm.ws.security.crypto.jar from WAS_HOME/plugins
  5. Create properties folder in the ThinClt directory and copy the properties from
      cd $PROFILE_HOME/properties
      cp ipc.client.props ~/ThinClt/properties/
      cp soap.client.props ~/ThinClt/properties/
      cp sas.client.props ~/ThinClt/properties/
      cp ssl.client.props ~/ThinClt/properties/
      cp wsjaas_client.conf ~/ThinClt/properties/
    
    • ipc.client.props: supports IPC connections.
    • soap.client.props: supports SOAP connections modify com.ibm.SOAP.securityEnabled to true existing value :
      com.ibm.SOAP.securityEnabled=false
      changed to :
      com.ibm.SOAP.securityEnabled=true
    • sas.client.props: supports JSR160RMI connections (preferred)
    • ssl.client.props: supports encrypted connections and modify user.root value
      user.root=/home/vagrant/ThinClt
      
    • wsjaas_client.conf: supports secured connections.
    cp -R ../properties/messages/ ~/ThinClt/properties/
    
    vagrant@ubuntu-was8:~/ThinClt/properties$ ls -lrt
    total 52
    drwxr-xr-x 18 vagrant vagrant  4096 Sep 30 14:54 messages
    -rwxr-xr-x  1 vagrant vagrant  5442 Sep 30 14:56 ipc.client.props
    -rwxr-xr-x  1 vagrant vagrant  5370 Sep 30 14:57 soap.client.props
    -rwxr-xr-x  1 vagrant vagrant 12114 Sep 30 14:57 sas.client.props
    -rwxr-xr-x  1 vagrant vagrant  5025 Sep 30 15:00 ssl.client.props
    -rwxr-xr-x  1 vagrant vagrant  3789 Sep 30 15:01 wsjaas_client.conf
    -rwxrwxr-x  1 vagrant vagrant  8046 Sep 30 16:39 wsadmin.properties
    
    
  6. Create logs directory in ThinClt
  7. Create profiles directory in ThinClt here you need to copy ThinClientProfile.py script.
    vagrant@ubuntu-was8:~/ThinClt$ mkdir profile
    vagrant@ubuntu-was8:~/ThinClt$ cp /vagrant/was8_5_install/ThinClientProfile.py profile/
    
    
  8. Copy scriptLibraries to ThinClt directory rename it to wasScriptLibraries
    vagrant@ubuntu-was8:~/ThinClt$ mv scriptLibraries wasScriptLibraries
    
    Make sure all the class files are deleted so they get recompiled with the new Jython. From the directory:
    find ./wasScriptLibraries –name “*.class” | xargs rm
    
  9. Copy thinClient.sh from the IBM download link then extract copy to ThinClt directory. Modify /opt to /home/vagrant  in vi editor : %s/opt/home\/vagrant/g
  10. Create a directory named etc in ~/ThinClt here the thin client key and trust store files will be created for use with encrypted connections to remote deployment managers.
    cd $PROFILE_HOME/etc/
    cp *p12 ~/ThinClt/etc
    
Use your brain when you failed to do the commands almost simplified more than IBM article!! :)

Monday, September 28, 2015

Setup WebSphere 8.5 on Ubuntu Vagrant box

I've started working on new adventure being in the WebLogic wold had some basic knowledge on Virtuallization with Vagrant and Oracle VirtualBox begin my experiment for WebSphere installation on Ubuntu box.

Prerequisites

  1. Download and install Vagrant for Windows
  2. Download and install Oracle VirtualBox
  3. Download Installation Manager

Lets Start Virtualization for WebSphere 8.5 with Vagrant


Initially I started following the steps which are given Pattrick Hueper in the Vagrant Ubuntu WebSphere 8.5. Downloaded the Vagrantfiles folder using git command.

git clone https://github.com/phueper/vagrantfiles.git

Then followed the read me document in that.

Modify the Vagrantfile

It stuck saying Ubuntu box is not available so I have changed the Vagrant file  with the following line:

    config.vm.box = "bento/ubuntu-14.04"
and I faced issue with the private network then I modified that with the following line:

    config.vm.network "private_network", ip: "192.168.33.113"

As suggested in that same github README.md dowloaded the InstallationManager from the IBM site.

copied the IMAgent file to /vagrant/was8_5_install

F:\was-work\vagrantfiles\ubuntu_websphere8_5>vagrant up [ skipping this output ]


F:\was-work\vagrantfiles\ubuntu_websphere8_5>vagrant provision
==> default: Running provisioner: shell...
    default: Running: C:/Users/Raghav/AppData/Local/Temp/vagrant-shell20150928-2572-1v2st7d.sh
==> default: stdin: is not a tty
==> default: Running Ansible provisioner defined in Vagrantfile.
==> default:
==> default: PLAY [playbook for system setup] **********************************************
==> default:
==> default: GATHERING FACTS ***************************************************************
==> default: <127 data-blogger-escaped-.0.0.1=""> REMOTE_MODULE setup
==> default: ok: [default]
==> default:
==> default: TASK: [apt update_cache=yes upgrade=dist] *************************************
==> default: <127 data-blogger-escaped-.0.0.1=""> REMOTE_MODULE apt update_cache=yes upgrade=dist
==> default: ok: [default] => {"changed": false, "msg": "Reading package lists...\nBuilding dependency tree...\nReading state information...\n0 u
pgraded, 0 newly installed, 0 to remove and 0 not upgraded.\n", "stderr": "", "stdout": "Reading package lists...\nBuilding dependency tree...\nR
eading state information...\n0 upgraded, 0 newly installed, 0 to remove and 0 not upgraded.\n"}
==> default:
==> default: TASK: [apt name=byobu state=latest] *******************************************
==> default: <127 data-blogger-escaped-.0.0.1=""> REMOTE_MODULE apt name=byobu state=latest
==> default: ok: [default] => {"changed": false}
==> default:
==> default: TASK: [apt name=git] **********************************************************
==> default: <127 data-blogger-escaped-.0.0.1=""> REMOTE_MODULE apt name=git
==> default: ok: [default] => {"changed": false}
==> default:
==> default: TASK: [apt name=openjdk-7-jdk] ************************************************
==> default: <127 data-blogger-escaped-.0.0.1=""> REMOTE_MODULE apt name=openjdk-7-jdk
==> default: ok: [default] => {"changed": false}
==> default:
==> default: TASK: [disable stupid dash] ***************************************************
==> default: <127 data-blogger-escaped-.0.0.1=""> REMOTE_MODULE command debconf-set-selections /vagrant/was8_5_install/dash_debconf
==> default: changed: [default] => {"changed": true, "cmd": ["debconf-set-selections", "/vagrant/was8_5_install/dash_debconf"], "delta": "0:00:00
.138656", "end": "2015-09-28 11:36:05.939550", "rc": 0, "start": "2015-09-28 11:36:05.800894", "stderr": "", "stdout": ""}
==> default:
==> default: TASK: [reconfigure stupid dash] ***********************************************
==> default: <127 data-blogger-escaped-.0.0.1=""> REMOTE_MODULE command dpkg-reconfigure -f noninteractive dash
==> default: changed: [default] => {"changed": true, "cmd": ["dpkg-reconfigure", "-f", "noninteractive", "dash"], "delta": "0:00:00.224939", "end
": "2015-09-28 11:36:06.225866", "rc": 0, "start": "2015-09-28 11:36:06.000927", "stderr": "", "stdout": ""}
==> default:
==> default: PLAY [playbook for swap file setup] *******************************************
==> default:
==> default: GATHERING FACTS ***************************************************************
==> default: <127 data-blogger-escaped-.0.0.1=""> REMOTE_MODULE setup
==> default: ok: [default]
==> default:
==> default: TASK: [Create swap file] ******************************************************
==> default: <127 data-blogger-escaped-.0.0.1=""> REMOTE_MODULE command dd if=/dev/zero of=/swapfile bs=1024 count=2048k creates="/swapfile"
==> default: skipping: [default]
==> default:
==> default: TASK: [Change swap file permissions] ******************************************
==> default: <127 data-blogger-escaped-.0.0.1=""> REMOTE_MODULE file path="/swapfile" owner=root group=root mode=0600
==> default: ok: [default] => {"changed": false, "gid": 0, "group": "root", "mode": "0600", "owner": "root", "path": "/swapfile", "size": 2147483
648, "state": "file", "uid": 0}
==> default:
==> default: TASK: [Check swap file type] **************************************************
==> default: <127 data-blogger-escaped-.0.0.1=""> REMOTE_MODULE command file /swapfile
==> default: changed: [default] => {"changed": true, "cmd": ["file", "/swapfile"], "delta": "0:00:00.002126", "end": "2015-09-28 11:36:06.613414"
, "rc": 0, "start": "2015-09-28 11:36:06.611288", "stderr": "", "stdout": "/swapfile: Linux/i386 swap file (new style), version 1 (4K pages), siz
e 524287 pages, no label, UUID=9d64efa0-eef3-43b2-829f-af768cd6b678"}
==> default:
==> default: TASK: [Make swap file] ********************************************************
==> default: skipping: [default]
==> default:
==> default: TASK: [Write swap entry in fstab] *********************************************
==> default: <127 data-blogger-escaped-.0.0.1=""> REMOTE_MODULE mount name=none src=/swapfile fstype=swap opts=sw passno=0 dump=0 state=present
==> default: ok: [default] => {"changed": false, "dump": "0", "fstab": "/etc/fstab", "fstype": "swap", "name": "none", "opts": "sw", "passno": "0
", "src": "/swapfile"}
==> default:
==> default: TASK: [Mount swap] ************************************************************
==> default: skipping: [default]
==> default:
==> default: TASK: [Minimise swapiness (only on out of memory)] ****************************
==> default: <127 data-blogger-escaped-.0.0.1=""> REMOTE_MODULE sysctl value=0 name=vm.swappiness
==> default: ok: [default] => {"changed": false}
==> default:
==> default: PLAY [playbook for vagrant user] **********************************************
==> default:
==> default: GATHERING FACTS ****
==> default: ***********************************************************
==> default: <127 data-blogger-escaped-.0.0.1=""> REMOTE_MODULE setup
==> default: ok: [default]
==> default:
==> default: TASK: [use ctrl-a screen mode] ************************************************
==> default: <127 data-blogger-escaped-.0.0.1=""> REMOTE_MODULE command byobu-ctrl-a screen
==> default: changed: [default] => {"changed": true, "cmd": ["byobu-ctrl-a", "screen"], "delta": "0:00:00.011868", "end": "2015-09-28 11:36:07.02
5121", "rc": 0, "start": "2015-09-28 11:36:07.013253", "stderr": "failed to connect to server\nfailed to connect to server", "stdout": "INFO: ctr
l-a will now operate in GNU Screen mode\nTo modify this behavior again later, run 'byobu-ctrl-a'"}
==> default:
==> default: TASK: [enable byobu on login] *************************************************
==> default: <127 data-blogger-escaped-.0.0.1=""> REMOTE_MODULE command byobu-launcher-install
==> default: changed: [default] => {"changed": true, "cmd": ["byobu-launcher-install"], "delta": "0:00:00.023743", "end": "2015-09-28 11:36:07.09
0566", "rc": 0, "start": "2015-09-28 11:36:07.066823", "stderr": "", "stdout": ""}
==> default:
==> default: TASK: [enable byobu prompt] ***************************************************
==> default: <127 data-blogger-escaped-.0.0.1=""> REMOTE_MODULE command byobu-enable-prompt
==> default: changed: [default] => {"changed": true, "cmd": ["byobu-enable-prompt"], "delta": "0:00:00.012451", "end": "2015-09-28 11:36:07.14459
2", "rc": 0, "start": "2015-09-28 11:36:07.132141", "stderr": "", "stdout": "\nYou will need to reload your shell configuration for this to take
effect...\n  . ~/.bashrc"}
==> default:
==> default: PLAY [playbook for WAS 8.5 Setup] *********************************************
==> default:
==> default: GATHERING FACTS ***************************************************************
==> default: <127 data-blogger-escaped-.0.0.1=""> REMOTE_MODULE setup
==> default: ok: [default]
==> default:
==> default: TASK: [unzip IM 1.8.3] ********************************************************
==> default: <127 data-blogger-escaped-.0.0.1=""> REMOTE_MODULE command mkdir -p /vagrant/tmp/im_1.8.3; cd /vagrant/tmp/im_1.8.3; unzip /vagrant/was8_5_install/agent.inst
aller.linux.gtk.x86_64_1.8.3000.20150606_0047.zip creates=/vagrant/tmp/im_1.8.3/userinstc #USE_SHELL
==> default: skipping: [default]
==> default:
==> default: TASK: [install IM 1.8.3] ******************************************************
==> default: <127 data-blogger-escaped-.0.0.1=""> REMOTE_MODULE command ./userinstc -s -sP -acceptLicense -input /vagrant/was8_5_install/userinstc.installationmanager_1.8
.record chdir=/vagrant/tmp/im_1.8.3 creates=/home/vagrant/IBM/InstallationManager/eclipse/IBMIM #USE_SHELL
==> default: skipping: [default]
==> default:
==> default: TASK: [register user for WAS 8.5 repository] **********************************
==> default: <127 data-blogger-escaped-.0.0.1=""> REMOTE_MODULE command . /vagrant/was8_5_install/ibm_user.sh; tools/imutilsc saveCredential -userName ${IBM_USER} -userPa
ssword ${IBM_PWD} -url http://www.ibm.com/software/repositorymanager/V85WASDeveloperILANL/repository.config chdir=/home/vagrant/IBM/InstallationM
anager/eclipse creates=/home/vagrant/IBM/WebSphere/AppServer/bin/manageprofiles.sh #USE_SHELL
==> default: changed: [default] => {"changed": true, "cmd": ". /vagrant/was8_5_install/ibm_user.sh; tools/imutilsc saveCredential -userName ${IBM
_USER} -userPassword ${IBM_PWD} -url http://www.ibm.com/software/repositorymanager/V85WASDeveloperILANL/repository.config", "delta": "0:00:08.582
384", "end": "2015-09-28 11:36:16.122411", "rc": 0, "start": "2015-09-28 11:36:07.540027", "stderr": "", "stdout": "Successfully saved the creden
tial to the secure storage file."}
==> default:
==> default: TASK: [install WAS 8.5] *******************************************************
==> default: <127 data-blogger-escaped-.0.0.1=""> REMOTE_MODULE command ./IBMIM -s -sP -acceptLicense -input /vagrant/was8_5_install/IBMIM.install_was85.record chdir=/hom
e/vagrant/IBM/InstallationManager/eclipse creates=/home/vagrant/IBM/WebSphere/AppServer/bin/manageprofiles.sh #USE_SHELL
==> default: changed: [default] => {"changed": true, "cmd": "./IBMIM -s -sP -acceptLicense -input /vagrant/was8_5_install/IBMIM.install_was85.rec
ord", "delta": "0:44:36.049535", "end": "2015-09-28 12:20:52.215826", "rc": 0, "start": "2015-09-28 11:36:16.166291", "stderr": "", "stdout": "
               25%                50%                75%                100%\n------------------|------------------|------------------|----------
--------|\n............................................................................\nInstalled com.ibm.websphere.IHSILAN.v85_8
==> default: .5.5006.20150529_0536 to the /home/vagrant/IBM/HTTPServer directory.\nInstalled com.ibm.websphere.DEVELOPERSILAN.v85_8.5.5006.201505
29_0536 to the /home/vagrant/IBM/WebSphere/AppServer directory.\nInstalled com.ibm.websphere.IBMJAVA.v70_7.0.9000.20150528_2007 to the /home/vagr
ant/IBM/WebSphere/AppServer directory.\nInstalled com.ibm.websphere.PLGILAN.v85_8.5.5006.20150529_0536 to the /home/vagrant/IBM/WebSphere/Plugins
 directory.\nInstalled com.ibm.websphere.WCTILAN.v85_8.5.5006.20150529_0536 to the /home/vagrant/IBM/WebSphere/Toolbox directory.\nCRIMA1002W WAR
NING: The following repositories are not connected:\n-/vagrant/tmp/im_1.8.3\n\n\nExplanation: Failed to connect to one or more repositories. The
repository might be unavailable for several reasons.\n\nUser Action: Check the following items:\nVerify the repository location is correct.\nFor
repositories that require credentials, verify that the credentials are correct. Credentials can be set in the Repositories preference.\nVerify th
e network connection is available. \nFor environments that use proxies, verify the proxy settings are correct. Proxy settings can be set in the H
TTP/FTP preference.\nUpdate offerings require that base offerings be available. Verify the base offering is available in a repository. Use the li
stAvailablePackages command to view the packages available in a repository.\nIf you are using the IBM Passport Advantage site, verify the connect
ion to the site is correct. Verify the Passport Advantage connection in the Passport Advantage preference.\nFor environments that use firewalls,
verify that access to the repository location is available.\nWARNING: /vagrant/tmp/im_1.8.3 is not a repository. It is an install package for Ins
tallation Manager version 1.8.3 (internal version 1.8.3000.20150606_0047). Installation Manager version 1.8.3 (internal version 1.8.3000.20150606
_0047) is already installed."}
==> default:
==> default: PLAY [playbook for profile creation in WAS 8.5] *******************************
==> default:
==> default: GATHERING FACTS ***************************************************************
==> default: <127 data-blogger-escaped-.0.0.1=""> REMOTE_MODULE setup
==> default: ok: [default]
==> default:
==> default: TASK: [create profile] ********************************************************
==> default: <127 data-blogger-escaped-.0.0.1=""> REMOTE_MODULE command ./IBM/WebSphere/AppServer/bin/manageprofiles.sh -create -templatePath /home/vagrant/IBM/WebSphere/
AppServer/profileTemplates/default/ -profileName rplan-profile -profilePath /home/vagrant/IBM/WebSphere/AppServer/profiles/rplan-profile/ -applyP
erfTuningSetting development chdir=/home/vagrant creates=/home/vagrant/IBM/WebSphere/AppServer/profiles/rplan-profile/ #USE_SHELL
==> default: changed: [default] => {"changed": true, "cmd": "./IBM/WebSphere/AppServer/bin/manageprofiles.sh -create -templatePath /home/vagrant/
IBM/WebSphere/AppServer/profileTemplates/default/ -profileName rplan-profile -profilePath /home/vagrant/IBM/WebSphere/AppServer/profiles/rplan-pr
ofile/ -applyPerfTuningSetting development", "delta": "0:01:04.080609", "end": "2015-09-28 12:21:57.046736", "rc": 0, "start": "2015-09-28 12:20:
52.966127", "stderr": "", "stdout": "INSTCONFSUCCESS: Success: Profile rplan-profile now exists. Please consult /home/vagrant/IBM/WebSphere/AppSe
rver/profiles/rplan-profile/logs/AboutThisProfile.txt for more information about this profile."}
==> default:
==> default: TASK: [increase admin console timeout] ****************************************
==> default: <127 data-blogger-escaped-.0.0.1=""> REMOTE_MODULE replace dest=/home/vagrant/IBM/WebSphere/AppServer/profiles/rplan-profile/config/cells/ubuntu-was8Node01Ce
ll/applications/isclite.ear/deployments/isclite/deployment.xml regexp='(invalidationTimeout=)"30"' replace='\1"1440"' backup=yes
==> default: changed: [default] => {"changed": true, "msg": "1 replacements made"}
==> default:
==> default: TASK: [start WAS] *************************************************************
==> default: <127 data-blogger-escaped-.0.0.1=""> REMOTE_MODULE command ./IBM/WebSphere/AppServer/profiles/rplan-profile/bin/startServer.sh server1 chdir=/home/vagrant #U
SE_SHELL
==> default: changed: [default] => {"changed": true, "cmd": "./IBM/WebSphere/AppServer/profiles/rplan-profile/bin/startServer.sh server1", "delta
": "0:00:47.676365", "end": "2015-09-28 12:22:44.896126", "rc"
==> default: : 0, "start": "2015-09-28 12:21:57.219761", "stderr": "", "stdout": "ADMU0116I: Tool information is being logged in file\n
 /home/vagrant/IBM/WebSphere/AppServer/profiles/rplan-profile/logs/server1/startServer.log\nADMU0128I: Starting tool with the rplan-profile profi
le\nADMU3100I: Reading configuration for server: server1\nADMU3200I: Server launched. Waiting for initialization status.\nADMU3000I: Server serve
r1 open for e-business; process id is 6632"}
==> default:
==> default: TASK: [create webserver config] ***********************************************
==> default: <127 data-blogger-escaped-.0.0.1=""> REMOTE_MODULE command ./IBM/WebSphere/AppServer/bin/wsadmin.sh -f IBM/WebSphere/AppServer/bin/configureWebserverDefiniti
on.jacl webserver1 IHS /home/vagrant/IBM/HTTPServer /home/vagrant/IBM/HTTPServer/conf/httpd.conf 8080 MAP_ALL /home/vagrant/IBM/WebSphere/Plugins
 unmanaged ubuntu-was8Node01 ubuntu-was8 linux 8008 admin admin webserver1 chdir=/home/vagrant #USE_SHELL
==> default: changed: [default] => {"changed": true, "cmd": "./IBM/WebSphere/AppServer/bin/wsadmin.sh -f IBM/WebSphere/AppServer/bin/configureWeb
serverDefinition.jacl webserver1 IHS /home/vagrant/IBM/HTTPServer /home/vagrant/IBM/HTTPServer/conf/httpd.conf 8080 MAP_ALL /home/vagrant/IBM/Web
Sphere/Plugins unmanaged ubuntu-was8Node01 ubuntu-was8 linux 8008 admin admin webserver1", "delta": "0:00:23.155538", "end": "2015-09-28 12:23:08
.131752", "rc": 0, "start": "2015-09-28 12:22:44.976214", "stderr": "", "stdout": "WASX7209I: Connected to process \"server1\" on node ubuntu-was
8Node01 using SOAP connector;  The type of process is: UnManagedProcess\nWASX7303I: The following options are passed to the scripting environment
 and are available as arguments that are stored in the argv variable: \"[webserver1, IHS, /home/vagrant/IBM/HTTPServer, /home/vagrant/IBM/HTTPSer
ver/conf/httpd.conf, 8080, MAP_ALL, /home/vagrant/IBM/WebSphere/Plugins, unmanaged, ubuntu-was8Node01, ubuntu-was8, linux, 8008, admin, admin, we
bserver1]\"\n \nInput parameters: \n \n   Web server name             - webserver1 \n   Web server type             - IHS \n   Web server install
 location - /home/vagrant/IBM/HTTPServer \n   Web server config location  - /home/vagrant/IBM/HTTPServer/conf/httpd.conf \n   Web server port
         - 8080 \n   Map Applications            - MAP_ALL \n   Plugin install location     - /home/vagrant/IBM/WebSphere/Plugins \n   Web server
 node type        - unmanaged \n   Web server node name        - ubuntu-was8Node01 \n   Web server host name        - ubuntu-was8 \n   Web server
 operating system - linux \n   IHS Admin port              - 8008 \n   IHS Admin user ID           - admin \n   IHS Admin password          - adm
in \n   IHS service name            - webserver1 \n  \nFound node with matching hostname. Using existing node ubuntu-was8Node01 \n \nNode definit
ion ubuntu-was8Node01 already exists.\n \nCreating the web server definition for webserver1 on node ubuntu-was8Node01.\nParameters for administer
ing IHS web server can also be updated using wsadmin script or admin console.\nWeb server definition for webserver1 is created.\n \nStart computi
ng the plugin properties ID.\nPlugin properties ID is computed.\n \nStart updating the plugin install location.\nPlugin install location is updat
ed.\n \nStart updating the plugin log file location.\nPlugin log file location is updated.\n \nStart updating the RemoteConfigFilename location.\
nPlugin remote config file location is updated.\n \nStart updating the RemoteKeyRingFileName location.\nPlugin remote keyring file location is up
dated.\n \nStart saving the configuration.\n \nConfiguration save is complete.\n \nComputed the list of installed applications.\n \nProcessing th
e application DefaultApplication.\nGet the current target mapping for the application DefaultApplication.\nComputed the current target mapping fo
r the application DefaultApplication.\nStart updating the target mappings for the application DefaultApplication.\nADMA5075I: Editing of applicat
ion DefaultApplication started.\nADMA5058I: Application and module versions are validated with versions of deployment targets.\nADMA
==> default: 5005I: The application DefaultApplication is configured in the WebSphere Application Server repository.\nADMA5005I: The application
DefaultApplication is configured in the WebSphere Application Server repository.\nADMA5005I: The application DefaultApplication is configured in
the WebSphere Application Server repository.\nADMA5005I: The application DefaultApplication is configured in the WebSphere Application Server rep
ository.\nADMA5113I: Activation plan created successfully.\nADMA5011I: The cleanup of the temp directory for application DefaultApplication is co
mplete.\nADMA5076I: Application DefaultApplication edited successfully. The application or its web modules may require a restart when a save is p
erformed.\nTarget mapping is updated for the application DefaultApplication.\n \nProcessing the application ivtApp.\nGet the current target mappi
ng for the application ivtApp.\nComputed the current target mapping for the application ivtApp.\nStart updating the target mappings for the appli
cation ivtApp.\nADMA5075I: Editing of application ivtApp started.\nADMA5058I: Application and module versions are validated with versions of depl
oyment targets.\nADMA5005I: The application ivtApp is configured in the WebSphere Application Server repository.\nADMA5005I: The application ivtA
pp is configured in the WebSphere Application Server repository.\nADMA5005I: The application ivtApp is configured in the WebSphere Application Se
rver repository.\nADMA5005I: The application ivtApp is configured in the WebSphere Application Server repository.\nADMA5113I: Activation plan cre
ated successfully.\nADMA5011I: The cleanup of the temp directory for application ivtApp is complete.\nADMA5076I: Application ivtApp edited succes
sfully. The application or its web modules may require a restart when a save is performed.\nTarget mapping is updated for the application ivtApp.
\n \nProcessing the application query.\nGet the current target mapping for the application query.\nComputed the current target mapping for the ap
plication query.\nStart updating the target mappings for the application query.\nADMA5075I: Editing of application query started.\nADMA5058I: App
lication and module versions are validated with versions of deployment targets.\nADMA5005I: The application query is configured in the WebSphere
Application Server repository.\nADMA5005I: The application query is configured in the WebSphere Application Server repository.\nADMA5005I: The ap
plication query is configured in the WebSphere Application Server repository.\nADMA5005I: The application query is configured in the WebSphere Ap
plication Server repository.\nADMA5113I: Activation plan created successfully.\nADMA5011I: The cleanup of the temp directory for application quer
y is complete.\nADMA5076I: Application query edited successfully. The application or its web modules may require a restart when a save is perform
ed.\nTarget mapping is updated for the application query.\n \nStart saving the configuration.\n \nConfiguration save is complete."}
==> default:
==> default: TASK: [load was module in IHS Config] *****************************************
==> default: <127 data-blogger-escaped-.0.0.1=""> REMOTE_MODULE lineinfile dest=/home/vagrant/IBM/HTTPServer/conf/httpd.conf line="LoadModule was_ap22_module /home/vagran
t/IBM/WebSphere/Plugins/bin/64bits/mod_was_ap22_http.so"
==> default: changed: [default] => {"backup": "", "changed": true, "msg": "line added"}
==> default:
==> default: TASK: [load plugin cfg in IHS Config] *****************************************
==> default: <127 data-blogger-escaped-.0.0.1=""> REMOTE_MODULE lineinfile dest=/home/vagrant/IBM/HTTPServer/conf/httpd.conf line="WebSpherePluginConfig /home/vagrant/IBM
/WebSphere/Plugins/config/webserver1/plugin-cfg.xml"
==> default: changed: [default] => {"backup": "", "changed": true, "msg": "line added"}
==> default:
==> default: TASK: [start IHS] *************************************************************
==> default: <127 data-blogger-escaped-.0.0.1=""> REMOTE_MODULE command ./IBM/HTTPServer/bin/apachectl start chdir=/home/vagrant #USE_SHELL
==> default: changed: [default] => {"changed": true, "cmd": "./IBM/HTTPServer/bin/apachectl start", "delta": "0:00:00.505888", "end": "2015-09-28
 12:23:09.080952", "rc": 0, "start": "2015-09-28 12:23:08.575064", "stder
==> default: r": "", "stdout": ""}
==> default:
==> default: PLAY RECAP ********************************************************************
==> default: default                    : ok=27   changed=15   unreachable=0    failed=0

F:\was-work\vagrantfiles\ubuntu_websphere8_5>

I've modified the root access and assigned IBM folder to vagrant user following:

vagrant@ubuntu-was8:~$ sudo chown -R vagrant:vagrant IBM

To launch the server

vagrant@ubuntu-was8:~$ IBM/WebSphere/AppServer/profiles/rplan-profile/bin/startServer.sh server1
ADMU0116I: Tool information is being logged in file
           /home/vagrant/IBM/WebSphere/AppServer/profiles/rplan-profile/logs/server1/startServer.log
ADMU0128I: Starting tool with the rplan-profile profile
ADMU3100I: Reading configuration for server: server1
ADMU3200I: Server launched. Waiting for initialization status.
ADMU3000I: Server server1 open for e-business; process id is 1530

And then start the webserver1 as follows:
vagrant@ubuntu-was8:~$ ./IBM/WebSphere/AppServer/bin/wsadmin.sh -f IBM/WebSphere/AppServer/bin/configureWebserverDefinition.jacl  webserver1 IHS /home/vagrant/IBM/HTTPServer /home/vagrant/IBM/HTTPServer/conf/httpd.conf 8080 MAP_ALL /home/vagrant/IBM/WebSphere/Plugins unmanaged ubuntu-was8Node01 ubuntu-was8 linux 8008 admin admin webserver1
WASX7209I: Connected to process "server1" on node ubuntu-was8Node01 using SOAP connector;  The type of process is: UnManagedProcess
WASX7303I: The following options are passed to the scripting environment and are available as arguments that are stored in the argv variable: "[webserver1, IHS, /home/vagrant/IBM/HTTPServer, /home/vagrant/IBM/HTTPServer/conf/httpd.conf, 8080, MAP_ALL, /home/vagrant/IBM/WebSphere/Plugins, unmanaged, ubuntu-was8Node01, ubuntu-was8, linux, 8008, admin, admin, webserver1]"

Input parameters:

   Web server name             - webserver1
   Web server type             - IHS
   Web server install location - /home/vagrant/IBM/HTTPServer
   Web server config location  - /home/vagrant/IBM/HTTPServer/conf/httpd.conf
   Web server port             - 8080
   Map Applications            - MAP_ALL
   Plugin install location     - /home/vagrant/IBM/WebSphere/Plugins
   Web server node type        - unmanaged
   Web server node name        - ubuntu-was8Node01
   Web server host name        - ubuntu-was8
   Web server operating system - linux
   IHS Admin port              - 8008
   IHS Admin user ID           - admin
   IHS Admin password          - admin
   IHS service name            - webserver1

Found node with matching hostname. Using existing node ubuntu-was8Node01

Node definition ubuntu-was8Node01 already exists.

Web server definition for webserver1 already exists.

Start computing the plugin properties ID.
Plugin properties ID is computed.

Start updating the plugin install location.
Plugin install location is updated.

Start updating the plugin log file location.
Plugin log file location is updated.

Start updating the RemoteConfigFilename location.
Plugin remote config file location is updated.

Start updating the RemoteKeyRingFileName location.
Plugin remote keyring file location is updated.

Start saving the configuration.

Configuration save is complete.

Computed the list of installed applications.

Processing the application DefaultApplication.
Get the current target mapping for the application DefaultApplication.
Computed the current target mapping for the application DefaultApplication.
Start updating the target mappings for the application DefaultApplication.
ADMA5075I: Editing of application DefaultApplication started.
ADMA5058I: Application and module versions are validated with versions of deployment targets.
ADMA5005I: The application DefaultApplication is configured in the WebSphere Application Server repository.
ADMA5113I: Activation plan created successfully.
ADMA5011I: The cleanup of the temp directory for application DefaultApplication is complete.
ADMA5076I: Application DefaultApplication edited successfully. The application or its web modules may require a restart when a save is performed.
Target mapping is updated for the application DefaultApplication.

Processing the application ivtApp.
Get the current target mapping for the application ivtApp.
Computed the current target mapping for the application ivtApp.
Start updating the target mappings for the application ivtApp.
ADMA5075I: Editing of application ivtApp started.
ADMA5058I: Application and module versions are validated with versions of deployment targets.
ADMA5005I: The application ivtApp is configured in the WebSphere Application Server repository.
ADMA5113I: Activation plan created successfully.
ADMA5011I: The cleanup of the temp directory for application ivtApp is complete.
ADMA5076I: Application ivtApp edited successfully. The application or its web modules may require a restart when a save is performed.
Target mapping is updated for the application ivtApp.

Processing the application query.
Get the current target mapping for the application query.
Computed the current target mapping for the application query.
Start updating the target mappings for the application query.
ADMA5075I: Editing of application query started.
ADMA5058I: Application and module versions are validated with versions of deployment targets.
ADMA5005I: The application query is configured in the WebSphere Application Server repository.
ADMA5113I: Activation plan created successfully.
ADMA5011I: The cleanup of the temp directory for application query is complete.
ADMA5076I: Application query edited successfully. The application or its web modules may require a restart when a save is performed.
Target mapping is updated for the application query.

Start saving the configuration.

Configuration save is complete.

Open a brower and try to access the admin console

https://192.168.33.113:9043/ibm/console/


Reference:

  1.   Vagrant box for WebSphere
  2. WebSphere 8.5 installation on Ubuntu

Containerization with Docker

Containerization with Docker
Learn modern microservices containers grow